Navigating the DJI RC 2 Controller: A Comprehensive Guide to Its Interface and Functionality
Introduction
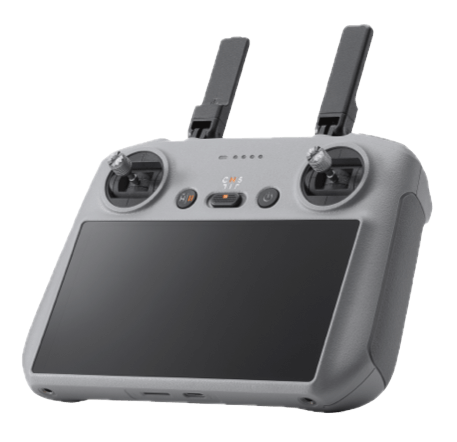
The DJI RC 2 controller represents a significant advancement in drone control technology, offering pilots intuitive access to a wide range of functions through its carefully designed interface. This document provides a detailed breakdown of each control element on the DJI RC 2, explaining not only their locations but also their functions and practical applications. Whether you’re a professional aerial photographer, a videography enthusiast, or a casual drone pilot, understanding these controls will help maximize your flight experience and creative potential.
Front Panel Controls
Left Thumb Knob (Gimbal Dial)
Located on the left side of the controller’s face, this rotary dial controls the gimbal tilt movement of your drone’s camera. By rotating this dial, pilots can smoothly adjust the vertical angle of the camera, enabling dynamic shots that transition from ground to horizon or precise framing of subjects at different elevations. The sensitivity of this dial is calibrated to allow for both quick adjustments and subtle, cinematic tilting movements. Many professional drone operators @DroneFilmmakers prefer to use this dial for creating smooth reveal shots during video capture.
Home/Pause Button
Positioned centrally on the controller for quick access, this button serves dual critical safety functions. A single press activates the pause function, which immediately stops the drone’s current flight path and holds its position, useful when you need to reassess your surroundings or avoid a potential obstacle. When pressed and held, it activates the Return to Home (RTH) feature, commanding the drone to automatically return to its takeoff point. This essential safety feature is particularly valuable in low battery situations or when signal connection becomes compromised.
C/N/S Flight Mode Switch
This three-position switch allows pilots to select between Cine (C), Normal (N), and Sport (S) flight modes:
- Cine Mode: Limits speed for smooth, cinematic footage
- Normal Mode: Balanced performance for general flying
- Sport Mode: Enables maximum speed and responsiveness
The switch is positioned for easy access during flight, allowing pilots to adapt to changing conditions or creative requirements without interrupting their flight experience. Professional aerial cinematographers often switch between these modes to achieve different visual effects within a single flight session.
Power Button
Located prominently on the controller’s front panel, the power button requires a press followed by a press-and-hold sequence to prevent accidental activation. A single LED around the button indicates power status and battery level through color and blinking patterns. The power button also functions as a sleep/wake button with a single press when the controller is already powered on, helping conserve battery when the controller is not in active use.
Right Thumb Knob (Camera Exposure/Aperture)
This dial typically controls camera exposure settings, though its specific function may vary depending on the connected drone model and camera settings. In most configurations, rotating this dial adjusts aperture or exposure compensation, allowing real-time exposure adjustments during flight without having to access the touch screen menu. This is particularly valuable for pilots shooting in changing light conditions or transitioning between differently lit environments during a single flight session.
Front 5 LED Lights
These indicator lights provide essential system information at a glance:
- Battery Level Indicators: Four LEDs display remaining controller battery in 25% increments
- Status LED: Displays connection status and system alerts through color codes
These lights are designed to be visible in various lighting conditions, providing critical information without requiring the pilot to look away from their drone or the controller screen.
Top Controls
Top Left Video Button
Located on the left shoulder of the controller, this dedicated recording button starts and stops video recording with a single press. The tactile design allows pilots to find and operate this button without looking away from the screen or drone. A red LED indicator typically illuminates when recording is active, providing visual confirmation of recording status.
Top Left Video Parameter Adjustment
Adjacent to the video button, this wheel or switch (depending on model variation) allows quick adjustments to video parameters such as ISO or shutter speed. This control enables on-the-fly adjustments to recording settings without navigating touch screen menus, keeping your focus on flying and composition rather than settings management.
Top Right Photo Button
Positioned on the right shoulder for easy access with the right index finger, this button captures still photos with a single press. In some configuration settings, a half-press can lock focus before full-press captures the image, similar to traditional camera operation. This familiar photography control scheme makes transitioning between ground and aerial photography more intuitive for experienced photographers.
Top Right Camera Zoom Control
This wheel adjacent to the photo button controls digital or optical zoom (depending on the drone camera capabilities). Precise incremental adjustments allow pilots to reframe shots without changing drone position, enabling more flexible composition choices and the ability to capture distant subjects with detail. Professional drone operators @AerialZoomMasters note that mastering this control can significantly expand creative possibilities during a flight.
Top Antennas
The dual adjustable antennas at the top of the controller can be positioned for optimal signal strength and range. Their articulation allows pilots to direct them toward the drone for maximum connectivity. The internal design implements advanced MIMO (Multiple-Input Multiple-Output) technology to maintain stable connections at extended ranges. Proper antenna positioning becomes increasingly important when operating at longer distances or in environments with potential signal interference.
Back and Bottom Controls
Back Side C1 and C2 Custom Buttons
Located on the underside of the controller where index fingers naturally rest, these programmable buttons can be customized through the DJI Fly app to perform specific functions based on individual preferences. Common configurations include:
- Focus adjustments
- Gimbal recenter
- Quick switches between photo and video modes
- Custom flight patterns activation
- Alternative camera parameter adjustments
The customization options allow pilots to create personalized control schemes optimized for their specific filming styles or mission requirements. Professional drone operators often develop different C1/C2 configurations for different types of projects.
Bottom Type-C Charge and Data Port
This USB Type-C port serves dual functions:
- Charging: Connects to power sources to recharge the controller’s internal battery
- Data Transfer: Enables firmware updates, media downloads, and connectivity with mobile devices or computers
The port supports fast charging technology, with typical full-charge times of approximately 2 hours depending on the charging adapter used. When connected to a computer, the controller can function as a media reader, allowing direct access to footage stored on the controller’s internal storage or inserted microSD card.
Bottom microSD Card Slot
This slot accepts standard microSD cards (with support typically up to 256GB depending on firmware version), providing expanded storage capacity for recording flight logs, cached video streams, and screenshots. The slot is protected by a dust cover to prevent contamination in field conditions. While most drone footage is recorded directly to the drone’s onboard storage, the controller’s microSD can serve as a backup or for storing additional reference material.
Function Integration and Workflow
The DJI RC 2’s control layout is designed for ergonomic efficiency, with the most frequently used controls positioned within natural thumb and index finger reach. This layout minimizes the need to adjust grip during flight, allowing pilots to maintain precise control while accessing various camera and flight functions.
The controller’s design philosophy emphasizes muscle memory development, where critical functions maintain consistent positions across different flight situations. This consistency allows pilots to focus on creative decisions rather than hunting for controls, particularly valuable in dynamic shooting environments or when capturing fleeting moments.
Advanced users often develop personalized work patterns using combinations of these controls. For example, documentary drone operators might program C1 to lock exposure while using the right knob to adjust gimbal movements, creating a single-handed solution for tracking moving subjects while maintaining consistent exposure.
Summary Table
| Control | Location | Primary Function | Secondary Function |
|---|---|---|---|
| Left Thumb Knob | Front Left | Gimbal Tilt | Custom (in some apps) |
| Home/Pause Button | Front Center | Pause Flight | Return to Home (hold) |
| C/N/S Switch | Front Left | Flight Mode Selection | N/A |
| Power Button | Front Right | Power On/Off | Sleep/Wake (single press) |
| Right Thumb Knob | Front Right | Exposure/Aperture | Custom (in some apps) |
| 5 LED Lights | Front Center | Battery & Status Indication | System Alerts |
| Video Button | Top Left | Start/Stop Recording | N/A |
| Video Parameter | Top Left | Adjust ISO/Shutter | Custom (in some apps) |
| Photo Button | Top Right | Capture Photo | Focus Lock (half-press) |
| Camera Zoom | Top Right | Adjust Zoom Level | N/A |
| Antennas | Top | Signal Transmission | N/A |
| C1 Button | Back Left | Programmable | N/A |
| C2 Button | Back Right | Programmable | N/A |
| Type-C Port | Bottom | Charging | Data Transfer |
| microSD Slot | Bottom | Storage Expansion | Firmware Updates (some models) |
Conclusion
The DJI RC 2 controller represents a thoughtful balance between comprehensive functionality and operational simplicity. Its design acknowledges the complex demands of drone piloting while organizing controls in an intuitive layout that becomes second nature with practice.
Understanding each control’s function and location is the first step toward developing the muscle memory and operational fluency that characterizes skilled drone pilots. With familiarity, these controls become transparent extensions of creative intent, allowing pilots to focus on composition, storytelling, and flight safety rather than the mechanics of controller operation.
Whether you’re capturing professional aerial cinematography, conducting industrial inspections, or simply enjoying recreational flights, mastering the DJI RC 2 interface will significantly enhance your drone piloting experience and creative possibilities.
#DronePiloting #DJIController #AerialPhotography
yakyak:{“make”: “anthropic”, “model”: “claude-3-7-sonnet-20250219”}